Essential Homemade Pasta
- PREP 1hrs 30min
- COOK 5min
- TOTAL 1hrs 35min
Our homemade pasta dough is perfect for home cooks of all levels, even beginners! Remember these tips for success: (1) Weigh your flour and eggs. If you don’t have a kitchen scale, we’ve included tips below the recipe for accurately measuring flour by volume to avoid adding too much. (2) Flour is your friend: as you work with the dough—kneading, rolling, and cutting—lightly dust all surfaces of the dough frequently with flour. This will prevent it from sticking to your work surface, pasta machine, or cutters. (3) Have fun! Pasta is an amazing recipe to make with a friend or someone you love!
You Will Need
3 cups (390g) Italian-style “00” flour or unbleached all-purpose flour, spooned and leveled
220g to 228g large eggs, approximately 4 large eggs without shell, eggs with rich yellow or orange yolks are best
3/4 teaspoon fine sea salt
1 tablespoon extra virgin olive oil
Directions
1Make pasta dough: Pile the flour on a clean work surface. Make a well in the middle and add the eggs, 3/4 teaspoon salt, and 1 tablespoon olive oil. Use a fork to break the yolks and gradually mix in the flour from the well’s edges, being careful not to break the walls of the well.
2When half of the flour is mixed in, use a bench scraper or your hands to bring the rest of the flour and eggs together, working all of the flour in. When the dough comes together, lightly flour your work surface and knead it for 5 to 7 minutes or until it is a smooth ball that bounces back slightly when you push a finger into it.
3Let the dough rest: Wrap the pasta dough with plastic and rest at room temperature for 30 minutes to 1 hour.
4Roll dough into sheets: Attach a pasta roller (sheeter) to your mixer or workbench, depending on your model, and then set it to the thickest setting (#1).
5Cut the dough into quarters. Grab one of the dough quarters, cover the rest with the plastic wrap, then use a rolling pin or your fingers to flatten the quarter of the dough into an oval that fits the thickest setting (#1).
6Run the dough through the largest setting 5 to 6 times before going to a smaller setting, always ensuring the dough is lightly floured before guiding it through the roller. To make uniform sheets, fold the dough in half lengthwise, then run it through the machine. Then, fold it widthwise before running it through the machine again. If you have uneven ends, you can fold them into the center and run the folded dough through the rollers to even them out (photo provided in the article).
7After the thickest setting, continue through the thinner settings (#2 and #3 three times, then #4 through #8 once or twice), lightly flouring both sides before each pass. The higher the number, the thinner the pasta, so stop when you are happy with the thickness (#6 is a good all-purpose thickness, and #8 is ideal for thin noodles like capellini).
8Set rolled dough sheets aside: When you are happy with the thickness of your first dough sheet, lightly dust both sides with flour, fold it over itself, and place it onto a floured surface or baking sheet, cover it with plastic wrap or a dish towel, and then repeat with the remaining dough.
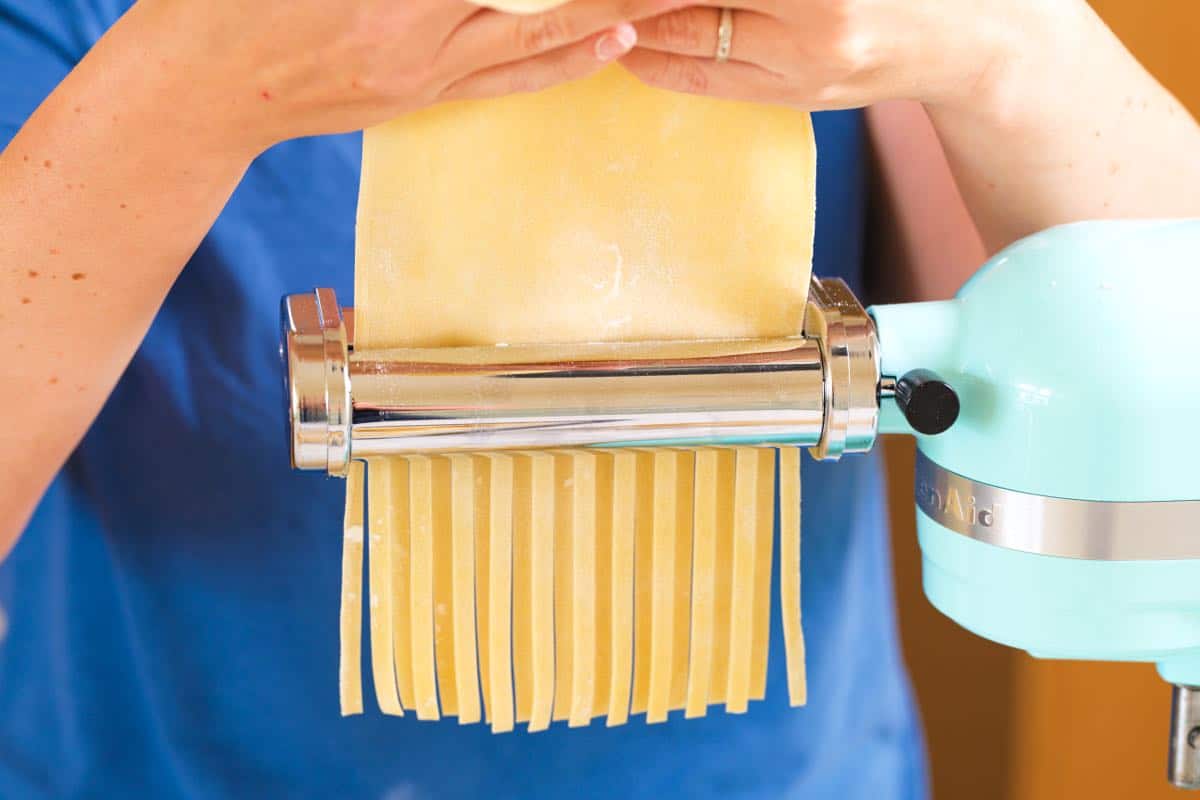
9Cut the pasta: Choose a pasta cutter attachment and run each sheet through it. If your sheets are very long, cut them to a more manageable length before guiding them through the cutter. Hang your cut pasta noodles on a drying rack or place small nests of noodles onto a parchment-lined and lightly floured baking sheet. Let the pasta dry until it is no longer sticky before cooking.
10Cook the pasta: Bring a pot of salted water to a boil, add the pasta, and cook until tender, with a nice chew (test it after 2 minutes, and continue to cook and test until you are happy). Fresh pasta typically takes between 2 and 5 minutes to cook.
Adam and Joanne's Tips
- Equipment needed: Pasta roller (also called a sheeter), pasta cutter attachments, baking sheets, and a pasta drying rack (optional). Our photos and video use a KitchenAid Stand Mixer with KitchenAid Pasta Attachments.
- Storing: Arrange the fresh pasta on a parchment-lined baking sheet in a single layer in strands or as little nests. Place the baking sheet into the freezer for 30 minutes or until the pasta is hard, then gently transfer it to a freezer bag or airtight container. Freeze for up to 3 months. Then, when ready to cook, you can cook from frozen.
- Measuring the flour: Measure by weight if you can. To use volume (cup) measurements, fluff the flour in its container, then gently scoop it into your measuring cup until slightly mounded. Level off the top with a knife for accurate measuring.
- Best flour: ’00’ flour (doppio zero flour) makes the paste smoother and silkier after cooking. All-purpose is fine, though! If you use all-purpose flour, use unbleached, as it produces a better texture.
- Eggs: You need 220g to 228g of eggs for this recipe, which should be 4 large eggs. If your eggs are on the smaller side, you may need to increase the liquid slightly by adding an egg yolk or some more beaten egg.
- The nutrition facts below are estimates.